
Wireguard VPN erstellen
Ganz einfach Möglichkeit ist es, das VPN als PiVPN zu installieren
Installation
curl -L https://install.pivpn.io | bashYes, that's it! It is *almost* that simple.
To elaborate a little more, you will want to install Raspberry Pi OS Lite on a Raspberry pi, we strongly recommend using the latest Raspberry Pi OS Lite image but the normal Raspberry Pi OS image will work as well, preferably enable ssh access and then begin.
After install, you may need to open a port on your router.
There is a (now slightly outdated) guided walkthrough of the install available here.
More information is also available on the PiVPN GitHub
Konfiguration eines Clients
Generating Private and Public Keys
WireGuard works by encrypting the connection using a pair of cryptographic keys. The key pair is used by passing the public key to the other party, which can then encrypt its message so that it can only be decrypted with the corresponding private key. To secure two-way communication, each side must have its own private and public keys, since each pair provides only one-way messaging.
Generate a client public and private key pair by running the following command:
pivpn -add
die public keys befinden sich im Ordner /home/pivpn/config
After that, create a client configuration file, in the following directory:
sudo nano /etc/wireguard/wg0.conf
In the file type:
WireGuard Startup
To start the connection, type the following command:
sudo wg-quick up wg0
Now the client can communicate with the server, you can ping the server from the client with the command
ping 10.0.0.1

To find out the connection status, run the following command:
sudo wg show
You will get all the connection details as shown below

Congratulations! Your client computer now has access to the VPN network.
Der folgende Abschnitt zeigt die Konfiguration eines WireGuard Clients unter Ubuntu 20.04 und 18.04.2 LTS.
WireGuard Private- und Public-Key für den Ubuntu Rechner erzeugen
Für eine erfolgreiche Verbindung benötigt jeder Teilnehmer an einem WireGuard VPN eigene Private- und Public-Keys. Sie können diese bequem mit dem nachfolgenden Befehl erzeugen. Die umask wird auf 077 gesetzt, um alle anderen User außer root den Zugriff zu verweigern.
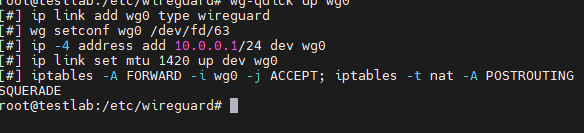
[Interface]
PrivateKey = <contents-of-client-privatekey>
Address = 10.0.0.1/24
PostUp = iptables -A FORWARD -i wg0 -j ACCEPT; iptables -t nat -A POSTROUTING -o eth0 -j MASQUERADE
PostDown = iptables -D FORWARD -i wg0 -j ACCEPT; iptables -t nat -D POSTROUTING -o eth0 -j MASQUERADE
ListenPort = 51820
[Peer]
PublicKey = <contents-of-server-publickey>
AllowedIPs = 10.0.0.2/32
Notes: In the publickey line insert the server public key that we generated in the previous article and on the private key insert the client private key.
Wireguard Client konfigurieren
sudo apt install wireguard resolvconf # Software installieren

sudo cp /media/kali/persitence/tails.conf /etc/wireguard/wg0-client-01.conf # Configdatei speichern

# Berechtigungen zuordnen
sudo chown root:root /etc/wireguard/wg0-client-01.conf
sudo chmod 644 /etc/wireguard/wg0-client-01.conf
sudo chmod 755 /etc/wireguard

# Starten
sudo wg-quick up /etc/wireguard/wg0-client-01.conf